Implement a Signature Block Custom Form Element using a Third Party Library
Implementing a custom form element allows you to augment the existing form elements that come with VertiGIS Studio Workflow.
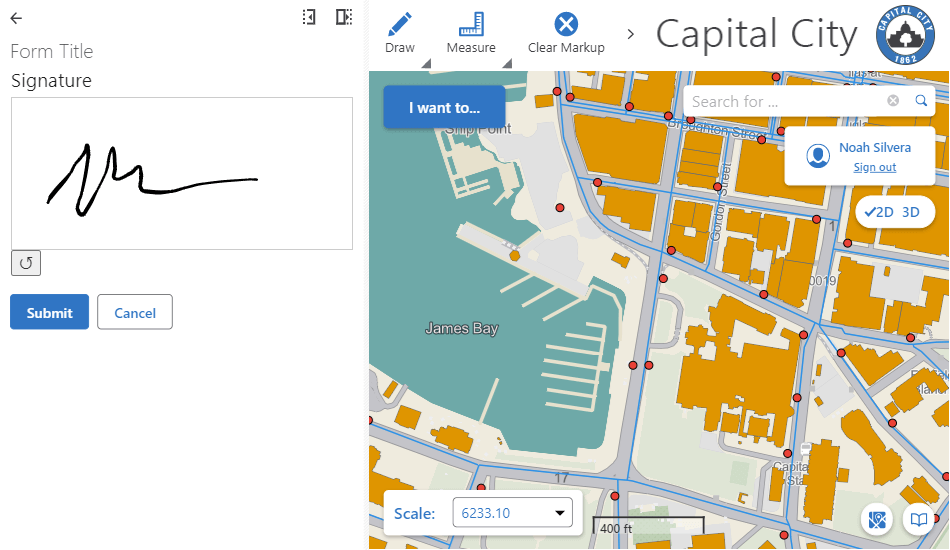
This article will walk you through creating a form element that uses the react-signature-pad-wrapper component to capture a user's signature.
Prerequisites
Follow the instructions in the Web Applications SDK page to set up your development environment.
A working knowledge of TypeScript is recommended before extending Workflow for web-based hosts.
Overview
Implementing a signature block custom form element for web applications using a third party library consists of the following steps:
- Adding third party library dependencies to your project.
- Creating the custom form element.
- Implementing the custom form element using the third party library.
Adding Dependencies
- Run
npm install react-signature-pad-wrapperin the terminal to install the third party react-signature-pad-wrapper component. - Run
npm install @types/signature_padin the terminal to install type information for the third party component. This is optional, but it provides an improved developer experience.
Set up Custom Form Element Skeleton
To create a new form element:
- Open the Workflow activity SDK in Visual Studio Code.
- Run
npm run generatein the terminal. - When prompted, select
Form Element. - Enter the name of the form element you would like to create and press
Enter. For example,SignatureBlock. - Open the newly created
src/elements/SignatureBlock.tsxfile.
Implement the Custom Form Element
Modify the skeleton form element implementation in src/elements/SignatureBlock.tsx to match the following example.
import React, { useRef } from "react";
import SignaturePadWrapper from "react-signature-pad-wrapper";
import SignaturePad, { SignaturePadOptions } from "signature_pad";
import {
    FormElementProps,
    FormElementRegistration,
} from "@vertigis/workflow";

interface SignatureBlockProps
    extends FormElementProps<string | undefined> {}

/**
 * A simple React Component that displays a signature input.
 * @param props The props that will be provided by the Workflow runtime.
 */
function SignatureBlock(
    props: SignatureBlockProps
): React.ReactElement {
    const signaturePad = React.createRef<SignaturePadWrapper>();
    const { setValue } = props;

    const handleClear = () => {
        // Clear the signature.
        signaturePad.current?.clear();
        // Clear the value of the element and raise the changed event.
        setValue(undefined);
    };

    const handleEnd = () => {
        // Get the signature from the SignaturePad component as a data URL.
        const dataUrl = signaturePad.current?.toDataURL();
        // Update the value of the element and raise the changed event.
        setValue(dataUrl);
    };

    const options: SignaturePadOptions = {
        onEnd: handleEnd,
    };

    return (
        <>
            <div style={{ border: "1px solid #cccccc" }}>
                <SignaturePadWrapper
                    height={150}
                    options={options}
                    ref={signaturePad}
                />
            </div>
            <button onClick={handleClear}>↺</button>
        </>
    );
}

const SignatureBlockElementRegistration: FormElementRegistration<SignatureBlockProps> =
    {
        component: SignatureBlock,
        getInitialProperties: () => ({ value: undefined }),
        id: "SignatureBlock",
    };

export default SignatureBlockElementRegistration;
Deploy the Form Element
Follow the instructions to build and deploy the activity pack.
Test the Form Element
Once your activity pack is hosted and registered, your SignatureBlock custom form element should appear in the form element toolbox in VertiGIS Studio Workflow Designer alongside the built-in form elements.
To use your custom form element in a workflow:
- Select the
Display Formactivity that you want to include your form element in. - Locate the
SignatureBlockform element in the toolbox and drag it onto the form. - Alternatively:
- Add a
Customform element to the form. - Set the
Custom Typeproperty of theCustomform element toSignatureBlock.
- Add a
- Test your workflow.