Add a Layer to a Map with an Activity
Some activities may need access to resources like the map. The @activate(MapProvider) pattern can be used to get the current map during the execution of your activity.
This article will walk you through creating a custom activity that adds a new layer to the map.
Prerequisites
Follow the instructions in the Web Applications SDK page to set up your development environment.
A working knowledge of TypeScript is recommended before extending Workflow for web-based hosts.
Setup the Activity
- Open up a terminal shell in the SDK folder.
- Run the command
npm run generateand create a new activityAddLayerToMap.
Modify the Activity to Access App Properties
- Add imports for
MapProvider,activate, andIActivityContext. - Add the
@activate(MapProvider)decorator to theexecutemethod. - Modify the
executemethod to mark it asasyncand return aPromise. - Modify the
executemethod to include thecontextandtypeparameters.
import type { IActivityHandler } from "@vertigis/workflow";
import { MapProvider } from "@vertigis/workflow/activities/arcgis/MapProvider";
import { activate } from "@vertigis/workflow/Hooks";
import type { IActivityContext } from "@vertigis/workflow/IActivityHandler";

/**
 * @supportedApps GWV
 * @category Custom Activities
 * @description An activity which adds a graphics layer to a map.
 */
@activate(MapProvider)
export class AddLayerToMap implements IActivityHandler {
    /** Perform the execution logic of the activity. */
    async execute(
        inputs: object,
        context: IActivityContext,
        type: typeof MapProvider
    ): Promise<void> {
        return;
    }
}
Use the MapProvider to get the map
Next, we create the MapProvider, load it asynchronously, and use it to get the map.
import type { IActivityHandler } from "@vertigis/workflow";
import { MapProvider } from "@vertigis/workflow/activities/arcgis/MapProvider";
import { activate } from "@vertigis/workflow/Hooks";
import type { IActivityContext } from "@vertigis/workflow/IActivityHandler";

/**
 * @supportedApps GWV
 * @category Custom Activities
 * @description An activity which adds a graphics layer to a map.
 */
@activate(MapProvider)
export class AddLayerToMap implements IActivityHandler {
    /** Perform the execution logic of the activity. */
    async execute(
        inputs: object,
        context: IActivityContext,
        type: typeof MapProvider
    ): Promise<void> {
        const mapProvider = type.create();
        await mapProvider.load();

        const map = mapProvider.map;
        if (!map) {
            throw new Error("map is required");
        }

        return;
    }
}
Add a New Map Layer with the Activity
Next, we use the ArcGIS API for JavaScript to create a graphics layer and add it to the map.
This activity assumes that it will be running in VertiGIS Studio Web, and so it uses the 4.x ArcGIS API for JavaScript.
import type { IActivityHandler } from "@vertigis/workflow";
import { MapProvider } from "@vertigis/workflow/activities/arcgis/MapProvider";
import { activate } from "@vertigis/workflow/Hooks";
import type { IActivityContext } from "@vertigis/workflow/IActivityHandler";
import * as Graphic from "esri/Graphic";
import * as GraphicsLayer from "esri/layers/GraphicsLayer";
import * as Polyline from "esri/geometry/Polyline";
import * as LineSymbol from "esri/symbols/LineSymbol";
/**
* @supportedApps GWV
* @category Custom Activities
* @description An activity which adds a graphics layer to a map.
*/
@activate(MapProvider)
export class AddLayerToMap implements IActivityHandler {
/** Perform the execution logic of the activity. */
async execute(
inputs: object,
context: IActivityContext,
type: typeof MapProvider
): Promise<void> {
const mapProvider = type.create();
await mapProvider.load();
const map = mapProvider.map;
if (!map) {
throw new Error("map is required");
}
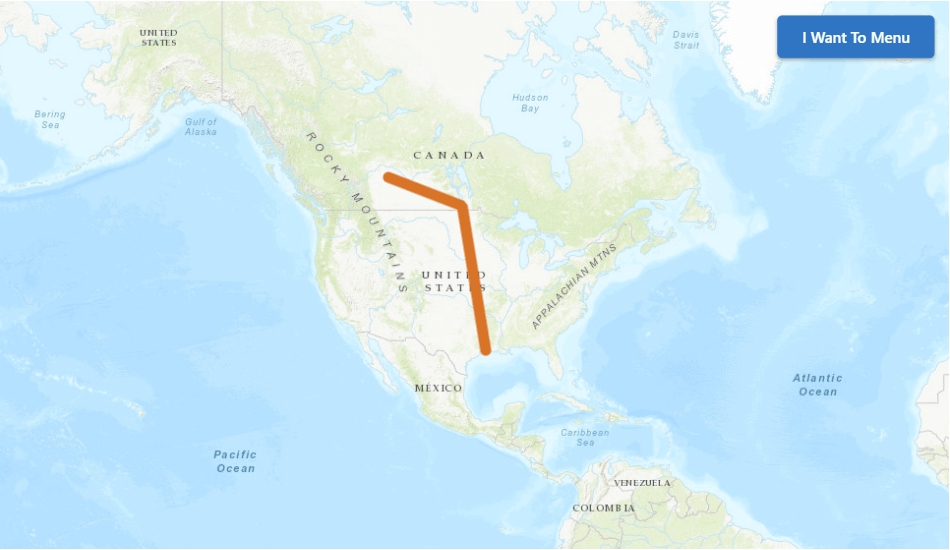
var polylineGraphic = new Graphic({
geometry: new Polyline({
paths: [
[
[-111.3, 52.68],
[-98, 49.5],
[-93.94, 29.89],
],
],
}),
symbol: new LineSymbol({
color: [226, 119, 40],
width: 4,
}),
});
var graphicsLayer = new GraphicsLayer({
graphics: [polylineGraphic],
});
map.add(graphicsLayer);
}
}
Deploy the Activity
Follow the instructions to build and deploy the activity pack.
Test the Activity
Once your activity pack is hosted and registered, your custom activity should appear in the activity toolbox in VertiGIS Studio Workflow Designer alongside the built-in activities, and can be used in the graphical interface like any other activity.
Now you can build a workflow that uses your new custom activity!