Run a Workflow from App Config
In this article, we can configure a workflow to run when the map is initialized.
Configuring a workflow to run when the map is initialized can be done through VertiGIS Studio Mobile Designer and this is the preferred method of configurable if Designer can be used. The goal of this article is to demonstrate the pattern of overriding behaviors with workflows.
Prerequisites
Follow along by setting up the VertiGIS Studio Mobile SDK and editing the minimal layout and app config provided.
If you just need to make a small change to the layout and app config of an existing application, you can download the config and layout files for the application, tweak them, and then re-upload them.
First, let's create a basic map using the layout and app config.
- Layout
- App Config
{
    "$schema": "..\\..\\ViewerFramework\\app-config\\mobile\\mobile-app-config.schema.json",
    "schemaVersion": "1.0",
    "items": [
        {
            "$type": "layout",
            "id": "desktop-layout",
            "url": "resource://layout-large.xml",
            "tags": ["mobile", "large"]
        }
    ]
}
<?xml version="1.0" encoding="utf-8" ?>
<layout
    xmlns="https://geocortex.com/layout/v1"
	xmlns:gxm="https://geocortex.com/layout/mobile/v1"
    xmlns:xsi="http://www.w3.org/2001/XMLSchema-instance"
    xsi:schemaLocation="https://geocortex.com/layout/v1 ../../ViewerSpec/layout/layout-mobile.xsd">
	<gxm:taskbar id="taskbar" orientation="vertical">
	    <map/>
    </gxm:taskbar>
</layout>
Next, add an app item to the configuration for the map component, and configure the map to run ui.display-notification on initialization as a test.
- App Config
- Layout
{
    "$schema": "..\\..\\ViewerFramework\\app-config\\mobile\\mobile-app-config.schema.json",
    "schemaVersion": "1.0",
    "items": [
        {
            "$type": "layout",
            "id": "desktop-layout",
            "url": "resource://layout-large.xml",
            "tags": ["mobile", "large"]
        },
        {
            "id": "map-config",
            "$type": "map-extension",
            "webMap": "0ba877a4185448cb832af9a661031e31",
            "onInitialized": [
                {
                    "name": "ui.display-notification",
                    "arguments": {
                        "message": "Map initialized"
                    }
                }
            ]
        }
    ]
}
<?xml version="1.0" encoding="utf-8" ?>
<layout
    xmlns="https://geocortex.com/layout/v1"
	xmlns:gxm="https://geocortex.com/layout/mobile/v1"
    xmlns:xsi="http://www.w3.org/2001/XMLSchema-instance"
    xsi:schemaLocation="https://geocortex.com/layout/v1 ../../ViewerSpec/layout/layout-mobile.xsd">
	<gxm:taskbar id="taskbar" orientation="vertical">
	    <map config="map-config"/>
    </gxm:taskbar>
</layout>
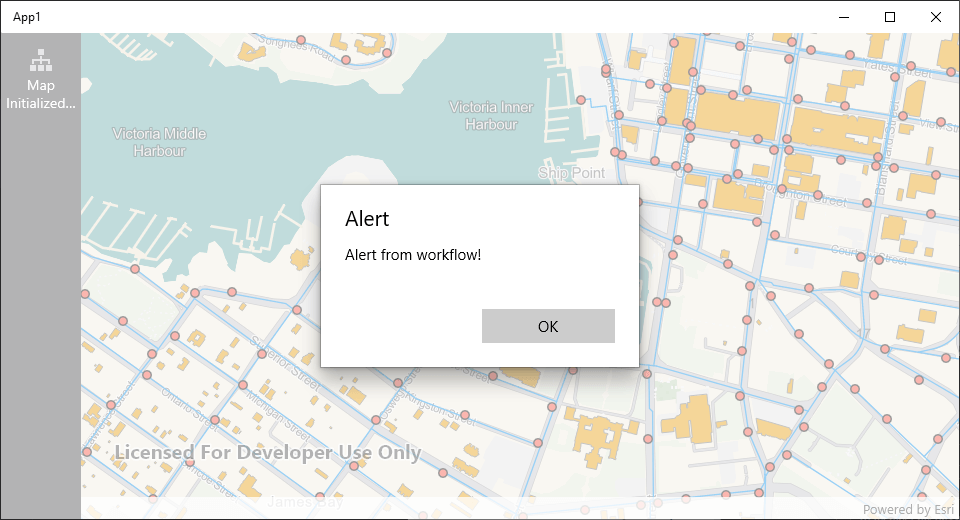
The next step is going to be replacing the ui.display-notification command with a workflow.run-* command. First, we need to create a workflow to use for the command.
- Open up VertiGIS Studio Workflow Designer and create and save a new workflow.
Optionally, you can
download this example workflow
that displays an alert and then
import it into the VertiGIS Studio Workflow Designer.
- Add an "Alert" activity as a test.
- Copy the ID of the the workflow from the URL
https://apps.vertigisstudio.com/workflow/designer/#workflow= 44010fc421dd4659b74fb921e09ba594
- Add the workflow as an app item to your app config.
The target property of the workflow app item determines the container in which the workflow UI, such as a form, will be displayed.
{
    "$schema": "..\\..\\ViewerFramework\\app-config\\mobile\\mobile-app-config.schema.json",
    "schemaVersion": "1.0",
    "items": [
        {
            "$type": "layout",
            "id": "desktop-layout",
            "url": "resource://layout-large.xml",
            "tags": ["mobile", "large"]
        },
        {
            "id": "map-config",
            "$type": "map-extension",
            "webMap": "0ba877a4185448cb832af9a661031e31",
            "onInitialized": [
                {
                    "name": "ui.display-notification",
                    "arguments": {
                        "message": "Map initialized"
                    }
                }
            ]
        },
        {
            "$type": "workflow",
            "id": "map-initialized-workflow",
            "title": "Map Initialized Workflow",
            "target": "#taskbar",
            "commandArgumentInput": "context",
            "portalItem": "<your-workflow-id-here>"
        }
    ]
}
Finally, you can configure the map to run this workflow on initialization.
- App Config
- Layout
- UI
{
    "$schema": "..\\..\\ViewerFramework\\app-config\\mobile\\mobile-app-config.schema.json",
    "schemaVersion": "1.0",
    "items": [
        {
            "$type": "layout",
            "id": "desktop-layout",
            "url": "resource://layout-large.xml",
            "tags": ["mobile", "large"]
        },
        {
            "id": "map-config",
            "$type": "map-extension",
            "webMap": "0ba877a4185448cb832af9a661031e31",
            "onInitialized": [
                {
                    "name": "workflow.run",
                    "arguments": {
                        "id": "map-initialized-workflow"
                    }
                }
            ]
        },
        {
            "$type": "workflow",
            "id": "map-initialized-workflow",
            "title": "Map Initialized Workflow",
            "target": "#taskbar",
            "commandArgumentInput": "context",
            "portalItem": "cd6bd434f3a44b479e06446318269e71"
        }
    ]
}
<?xml version="1.0" encoding="utf-8" ?>
<layout
    xmlns="https://geocortex.com/layout/v1"
	xmlns:gxm="https://geocortex.com/layout/mobile/v1"
    xmlns:xsi="http://www.w3.org/2001/XMLSchema-instance"
    xsi:schemaLocation="https://geocortex.com/layout/v1 ../../ViewerSpec/layout/layout-mobile.xsd">
	<gxm:taskbar id="taskbar" orientation="vertical">
		<map config="map-config" slot="main"/>
	</gxm:taskbar>
</layout>
Relevant SDK Samples
The VertiGIS Studio Mobile SDK Samples project has a variety of workflow samples:
Next Steps
VertiGIS Studio Workflow
Learn more about VertiGIS Studio Workflow
Change the Default Map Click Behavior with a Workflow
Learn more about overriding default behaviors