Change Default Map Click Behavior
VertiGIS Studio Web comes with default behavior that runs on a map click. The default behavior will identify and display details for results in the nearby area. But what if you want to replace the functionality with your own behavior? This can be accomplished by leveraging VertiGIS Studio Workflow and editing the app config.
It's actually possible to configure the Map's onClick event in VertiGIS Studio Web Designer, by setting a workflow as the action for the Maps click event. However, the point of this tutorial is to demonstrate the concept of configuring actions using the app config.
What you're Building
We will modify the default map on click behavior to buffer the click geometry by a user provided distance and create a graphic which visualizes this buffer.

Prerequisites
- Follow along by setting up the VertiGIS Studio Web SDK and editing the minimal layout and app config provided.
- Check out the deployment instructions to learn about how to deploy layout and app config to an application.
Initial Set up
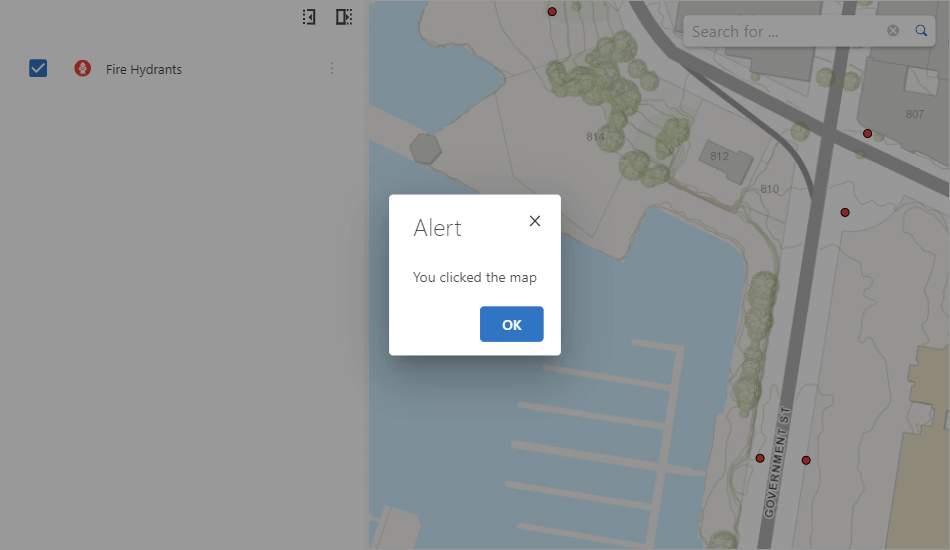
Start the VertiGIS Studio Web SDK with the following layout and app JSON. You should see a simple application with one layer, Fire Hydrants, which has a related table Fire Hydrant Surveys.
Try clicking the map. It should return results for the point you clicked in the results list.
- Layout
- App Config
{
    "schemaVersion": "1.0",
    "items": [
        {
            "$type": "map-extension",
            "id": "default",
            "onClick": [
                "geometry.add-pixel-tolerance",
                "tasks.identify",
                "results.display-details"
            ],
            "webMap": "https://www.arcgis.com/home/item.html?id=0ba877a4185448cb832af9a661031e31"
        },
        {
            "$type": "results",
            "id": "results-list-config",
            "onFeatureClick": ["results.display-details"]
        }
    ]
}
<?xml version="1.0" encoding="UTF-8"?>
<layout xmlns="https://geocortex.com/layout/v1">
  <split resizable="true">
    <panel show-close-button="false" width="26">
      <layer-list models="#map-primary"/>
      <results-list active="false" config="results-list-config"/>
      <feature-details active="true" />
      <workflow active="false"/>
    </panel>
    <stack>
      <map id="map-primary" config="default"/>
    </stack>
  </split>
</layout>
Set up a Workflow to Run on Map Click
The first thing we need to do is override the default map click behavior. We can do this by editing the default behavior for the <map/> component in the app config. The default behavior for the map's onClick event is a command chain that runs geometry.add-pixel-tolerance and then tasks.identify, and finally, results.display-details.
{
    "schemaVersion": "1.0",
    "items": [
        ...
        {
            "$type": "map-extension",
            "id": "default",
            "onClick": [
                "geometry.add-pixel-tolerance",
                "tasks.identify",
                "results.display-details"
            ],
            ...
        }
        ...
    ]
}
First, we are going to replace the command chain with a workflow.run command that replicates this behavior.
- Open up VertiGIS Studio Workflow Designer and create and save a new workflow.
- Add an "Alert" activity as a test.
- Copy the ID of the the workflow from the URL
https://apps.vertigisstudio.com/workflow/designer/#workflow= 44010fc421dd4659b74fb921e09ba594
- Add the workflow as an app item to your app config.
{
    "schemaVersion": "1.0",
    "items": [
        ...
        {
            "$type": "workflow",
            "id": "map-click-workflow",
            "title": "Map Click Workflow",
            "commandArgumentInput": "context",
            "portalItem": "<your-workflow-id-here>"
        },
        ...
    ]
}
- Next, configure the
onClickproperty of the Map Component in the app config to run the workflow.
{
    "schemaVersion": "1.0",
    "items": [
        ...
        {
            "$type": "map-extension",
            "id": "default",
            "onClick": "workflow.run-map-click-workflow",
            ...
        }
    ]
}
- Run the app and test your workflow. You should see your alert pop up when you try to click on the map.
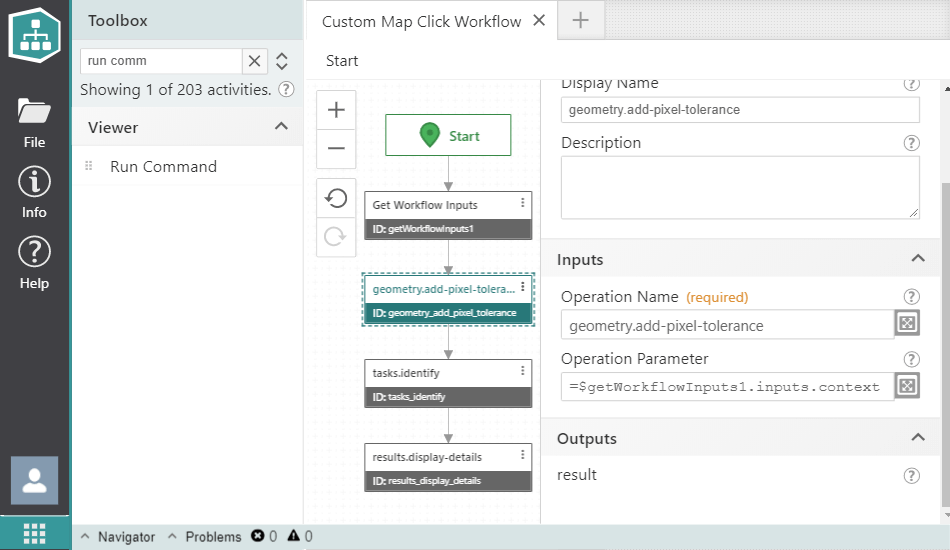
- Open up your workflow in the VertiGIS Studio Workflow Designer again. The default behavior we just overrode can be recreated with the use of RunCommand and RunOperation activities.
geometry.add-pixel-toleranceandtasks.identifyare operations, so they need RunOperation activities, andresults.display-detailsis a command so it needs a RunCommand Activity. Chain these three activities together, passing the workflow context togeometry.add-pixel-toleranceand then passing the output of that operation totasks.identify, and finally passing the output oftasks.identifytoresults.display-details.
- Save the workflow and reload the application. Test the map click functionality and ensure it works as it originally did.
Extend the Workflow to Create a Graphic Buffering the Click Geometry
At this point, you can choose to extend the map click behavior with VertiGIS Studio Workflow in whatever way is appropriate for your tutorial. You could execute a different "identify" for external results and add them to the set of results displayed, or zoom the map to a specific orientation and scale, or display a form for the user to fill out with relevant information to that location. For this example, a workflow was created which asks a user for a buffer distance, and creates a graphic showing the buffer around the click location.