Managing Map Areas Through Start-up Workflows

Map areas are a key feature of VertiGIS Studio Mobile, enabling users to work with a map in a completely disconnected state. But how can you help ensure your users have the data downloaded and updated before they go into the field? In this blog post we'll look at using VertiGIS Studio Workflow to notify users when their data may be stale, and even to automatically trigger a download or update as soon as they open their app.
Alerting the user of stale map areas
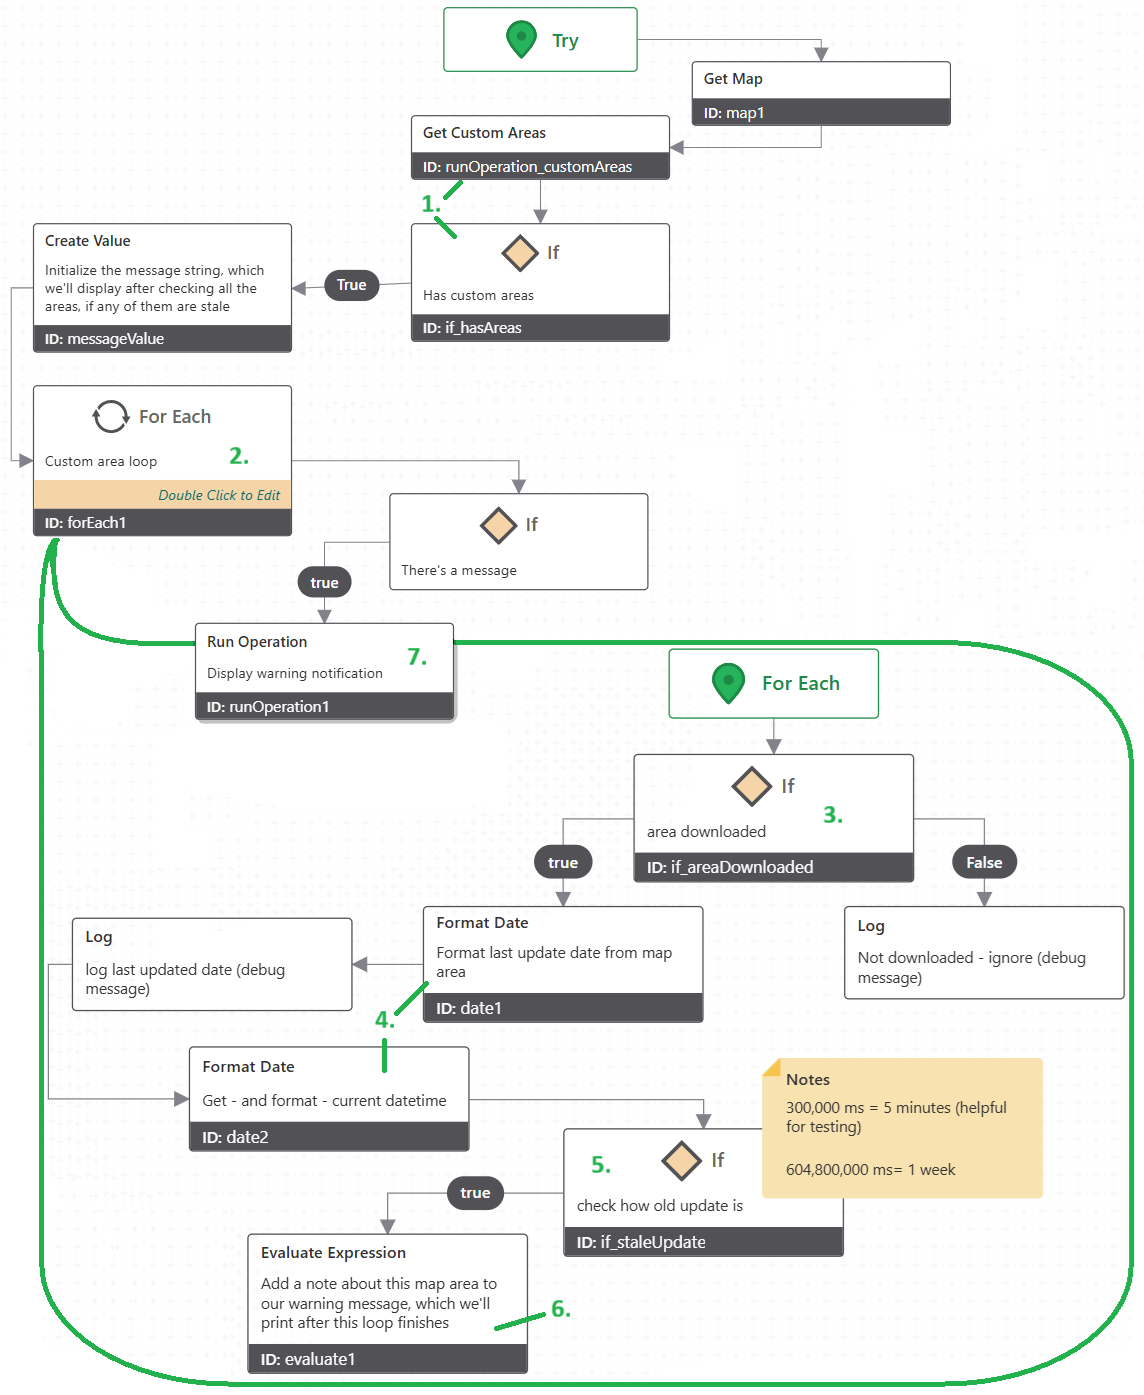
The first Workflow we'll look at checks for custom areas which have already been downloaded, calculates if the date it was last updated is past a certain threshold, and alerts the user if the area is stale. The Workflow can be downloaded here and imported into Designer.
I'll walk you through the key functionality.
Both the Workflows here are wrapped in a Try/Catch so they will stop gracefully if something goes wrong. Drill into the Try block to see the main functionality.
-
First, this Workflow runs the offline.get-custom-areas command, and checks if there are any results (if not, there's nothing more to do).
This command, and subsequently this whole Workflow, works without an Internet connection, because it's only looking at local data on the device.
-
Next, we're going to loop over each custom map area, and build a message to display if they're stale.
-
Inside the For Each loop, we first check the status of the map area to see if it is downloaded.
The status is indicated as a flags enum, where
2represents theDownloadedstate and4representsActive. Hence the bitwise&operations in this If activity checks for the presence of theDownloadedorActivestate flags. -
If the area is downloaded, we'll compare the last update date on the map area with the current date and time to see if it's stale. Workflow's Format Date activity makes it easy to do the math with the unix timestamp, and to display the date in a friendly way, so we'll use that activity.
-
Here's where we do that math: in this example, checking if the update was more than one week ago from today.
If you have a different update schedule, e.g. "my users should update their map areas every Monday", you could adjust the logic here.
-
Rather than displaying a separate notification for each stale area, we're going to aggregate all the stale area warnings so we can just display a single notification after we've finished checking each area.
-
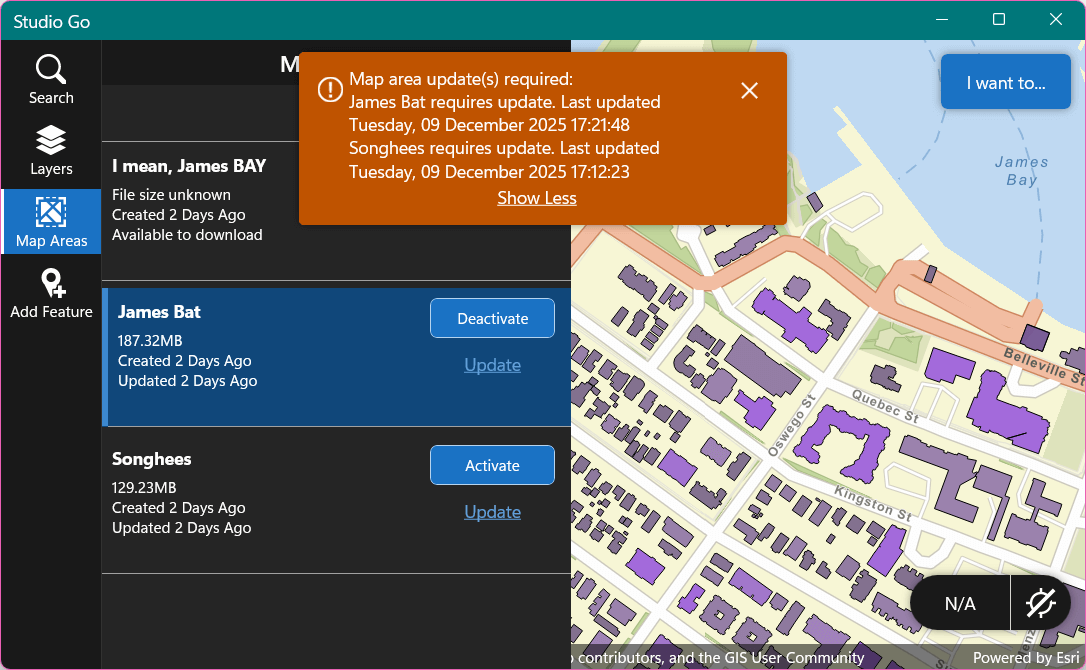
Here's where we run the ui.display-notification operation, displaying the alert to the user (if we did indeed add any lines to the message in Step 6).
In this example, we display it at the 'warning' level. You could add some logic that displays an 'info' level notification if their map areas are only a few days stale and a 'warning' level for older ones, or display a more obvious alert rather than just a notification, etc.
Here's the result:
Automatically downloading areas
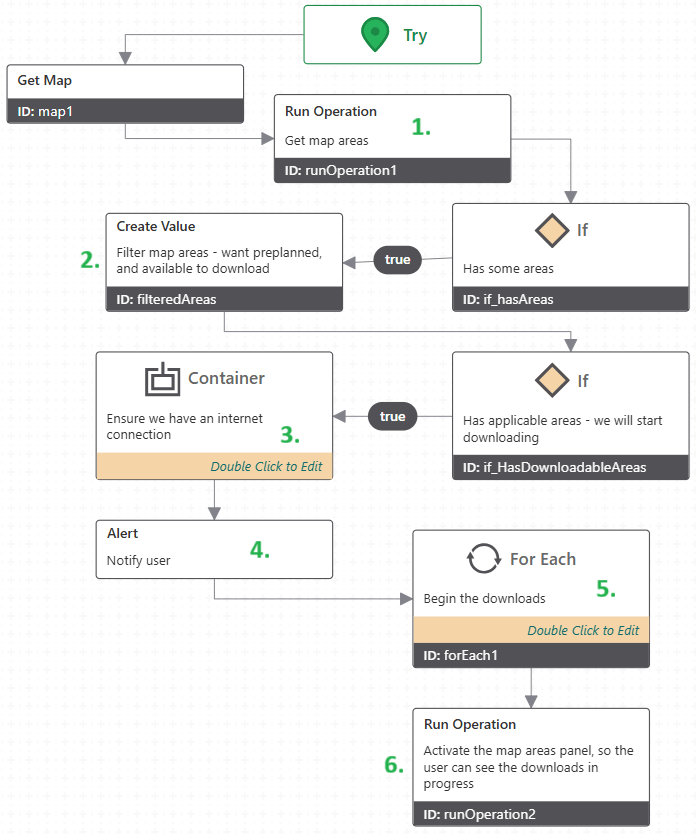
The second Workflow we'll look at deals with preplanned areas. It will check if there are any which have not yet been downloaded. If there are, it notifies the user, automatically begins the download process, and opens the Map Areas panel so the user can monitor the download progress. It can be downloaded for import here.
-
This Workflow starts off similarly to the first one, but uses offline.get-areas instead of offline.get-custom-areas. This returns both custom and preplanned areas.
-
We want to filter through all the map areas to find only the ones that are preplanned (which we can do by checking if the
Removableproperty is false) and which are in theAvailable to Downloadstate (a value of0in the enum described earlier).You could change the logic here to look for a map areas with a specific title, if you only wanted some subset of your map areas to be automatically downloaded, for example.
-
If we have no Internet connection, the Workflow would have still gotten to this point if it found local map areas (custom, or already-downloaded preplanned areas). However, we won't be able to perform a download without a connection. Inside this Container activity we'll check that we are connected, and that network requests are not disabled in the app settings. If the conditions are not met, we'll exit the Workflow early.
-
Now we know we can start the downloads; let's alert the user.
-
Here we'll loop over each preplanned area, and call offline.download-area via the Run Command activity.
Using Run Command rather than Run Operation here ensures that the Workflow will move on to the next activity as soon as it triggers the command, as opposed to waiting for the operation (i.e. the whole download process) to complete. This enables us to get multiple downloads all running in parallel.
If you wanted to modify this Workflow to also update areas which are already downloaded, you could adjust the filter in Step 2 to include these map areas (see the check from Step 3 in the first Workflow) and call the offline.update-area command in this loop as well.
-
Finally, we'll call ui.activate to automatically open the Offline Areas panel. Now the user can watch their downloads proceed, and if they want to manually start downloading a custom map area at the same time or something, they can do so.
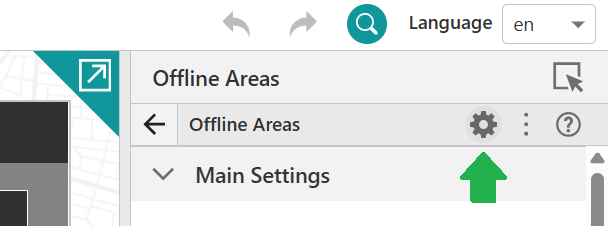
Note that the argument to ui.activate in this sample Workflow, "item://offline/map-areas", is using the default item id ("map-areas") for the Offline Areas panel from the Mobile Default app template from Designer. If your component's id is different, you'll have to change this argument. You can check the id by clicking the cog icon at the top of the component's configuration panel in Designer.
And here's the result in action:
Running the Workflows on start-up
Both of the above Workflows are designed to run from the same point: from the 'Map Initialized' event. This is because the first step, checking for map areas, needs to access the map. The configuration for this can be found in Designer, under the Map Component's Events configuration section.
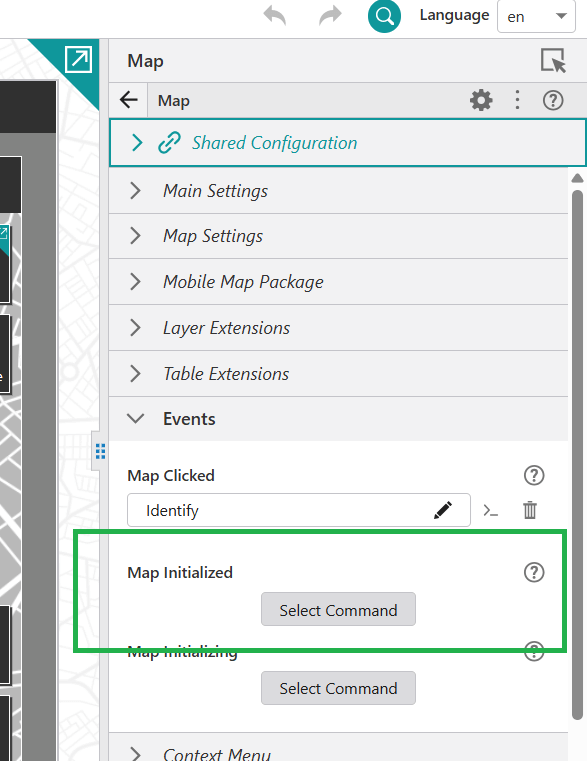
Once you've added your Workflow there, it will run every time the user launches or refreshes the app. Since neither of these Workflows displays a Workflow Form, set the Target property to 'None'. This prevents a panel from unnecessarily appearing in the taskbar to host your Workflow.

Feel free to copy these Workflows and modify them as necessary for your own use cases!