Override Search Area in VertiGIS Studio Mobile

VertiGIS Studio Mobile enables app developers to override the default search area, which is the current visible area of the map when the app is not backed by an MMPK, to a custom area (extent) of the developer's choosing. This requires hand-editing the app JSON and working out a few details. In this blog post, I will guide you on how to do that and how to define a custom extent for search to operate within.
1 - Creating the Search Override Workflow
To start off the work, we'll need to head to VertiGIS Studio Workflow and create a new blank Workflow. Call it Search Override. This Workflow will be used to override the search functionality in Mobile.
To create the Workflow, you may either download and import this skeleton file in Workflow Designer, or create and configure it yourself in the following way:
- Add a
Get Workflow Inputsactivity with IDgetWorkflowInputs1 - Add a
Set Propertyactivity, which we'll leave empty for now. - Add a
Run Commandactivity; configure the parameters as follows:Command Name:="tasks.search,results.display"Command Parameter:=$getWorkflowInputs1.inputs.context
We will be using this Workflow to override the default search behaviour in Mobile so that we change the search area prior to performing the search.
2 - Finding the Area to Override Search
There are two ways of obtaining the extent numbers needed to override the search area: Using a layer's FullExtent property to obtain the extent, or using a geometry picker to create a custom search area.
I will walk you through how to use both of these methods to enable the most amount of customization and to fit your use case.
2.1 - Using a layer's FullExtent property to obtain the extent
Using a layer to obtain the extent numbers is the more foolproof way since it doesn't involve hard-coding any specific numbers to Workflow.
This is the recommended way, as obtaining custom extent numbers is a more complicated process. However, while testing, I found this to cover a much larger area than what's actually covered by the features of the layer so, although this works to extend the search area, developers who want a finer control of the search area override should use the method described in section 2.2.
On the Search Override Workflow, add a Get Layer activity to obtain a layer that will act as the basis of the search area. Add this activity to the start of the Workflow. Assuming the Get Layer activity's ID is layer1, we will be using =$layer1.layer.Unwrap().FullExtent as input to the Set Property activity; the next section will point out how to fill the activity properly. layer.unwrap() is an undocumented function which unwraps a layer from what we use internally in VertiGIS Studio products into ESRI's layer objects.
2.2 - Using custom bounds to obtain the extent
Creating a custom search area requires a bit more work to obtain the required search extent numbers. To start off, you may either download and import this skeleton file in Workflow Designer, or you can create it yourself.
If you wish to create the Workflow yourself: Create a new blank Workflow, call it something along the lines of Get Geometry from Geometry Picker. We will be using this Workflow to obtain the extent values from a geometry picker which will be used to define our search area. Follow these steps to configure the Workflow:
- Add a
Display Formactivity, with IDform1, and add a geometry picker in there. Make sure that the geometry type is set toPolygon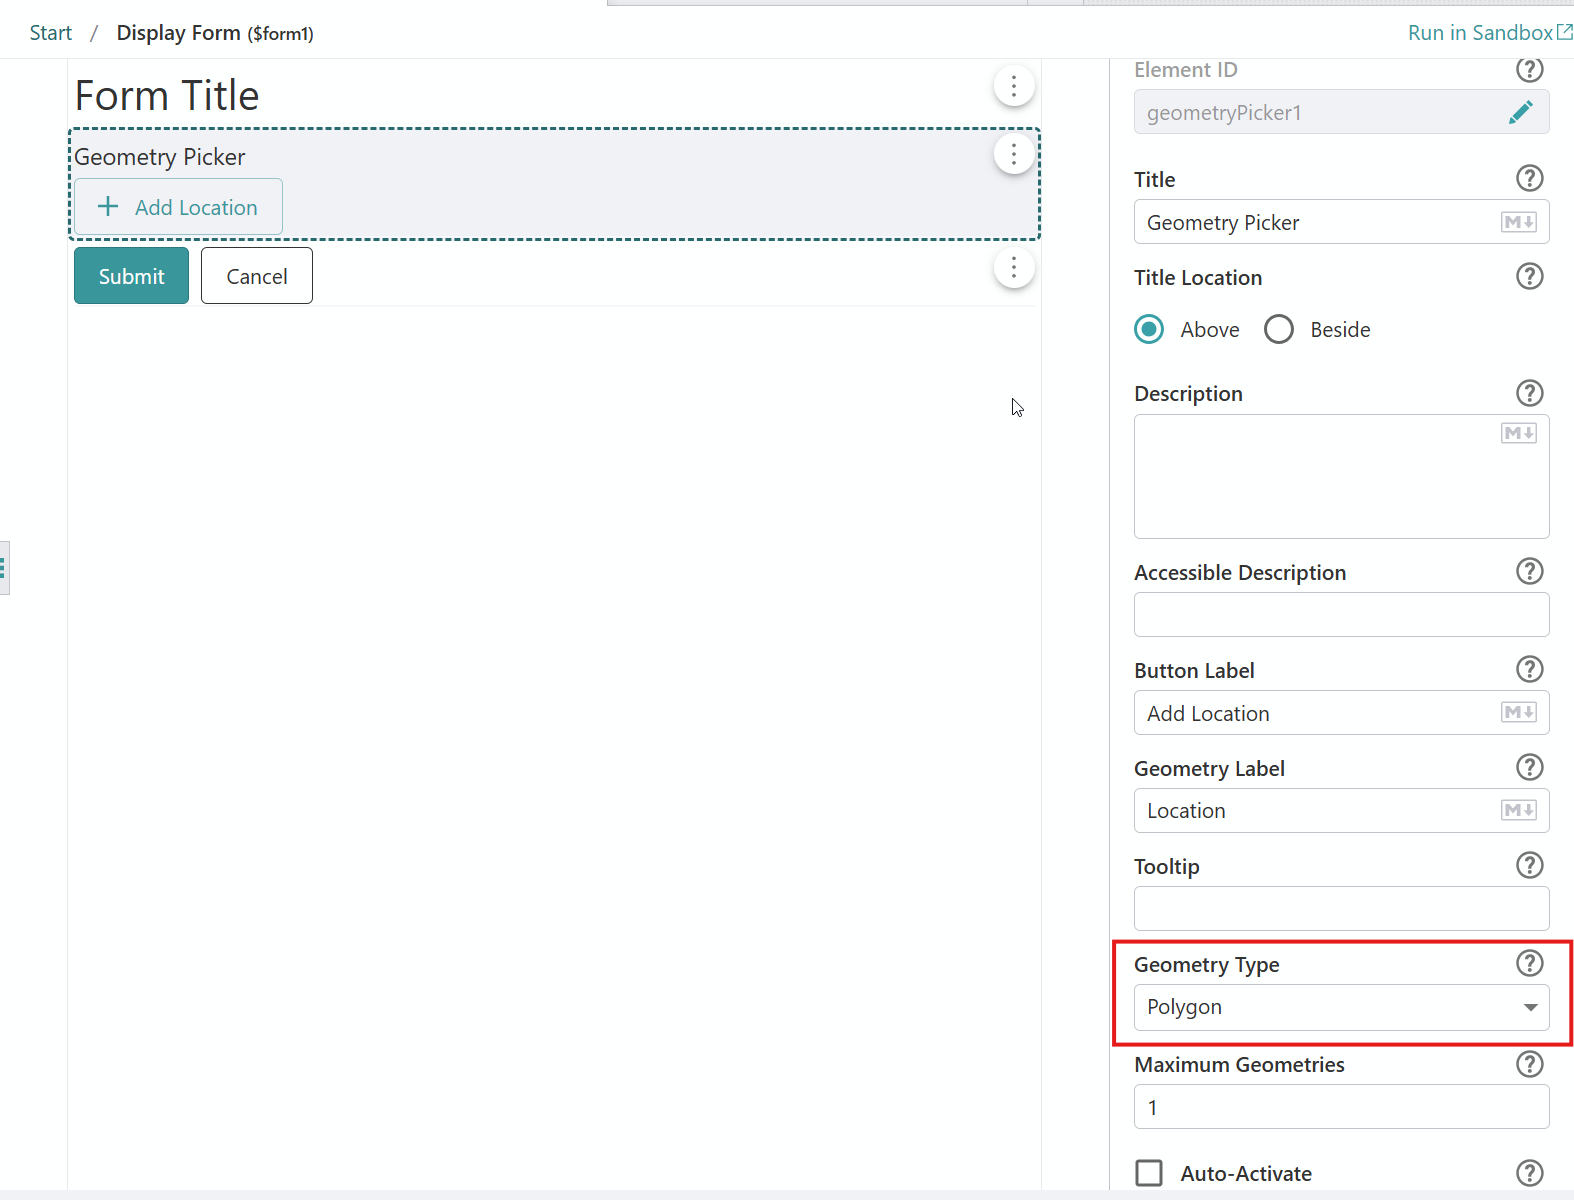
- Add a
Convert To JSONnext and use=$form1.state.geometryPicker1.value.geometry[0]as the inputs to theObjectparameter - Use another
Display Formactivity to display these results in a way that is easily copyable. Add aText Areaform element and a load event on the form's title that replaces the text area's value with the output from theConvert To JSONactivity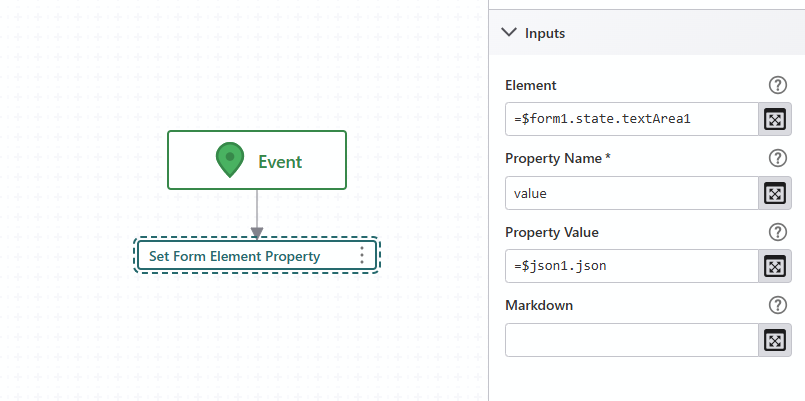
The output should look something like the following but unformatted; you may format it for readability. Ensure sure the first point matches the last point and that these two are the only identical points.
{
    "rings": [
        [
            [-13261447.128629405, 4248956.0934711397],
            [-13255720.535082744, 3797373.288077388],
            [-12575073.987822598, 3791646.6945307283],
            [-12581618.666161638, 4253046.5174330398],
            [-13261447.128629405, 4248956.0934711397]
        ]
    ],
    "spatialReference": { "wkid": 102100, "latestWkid": 3857 }
}
Make sure to copy the spatial reference info as the extent numbers are meaningless without them.
After obtaining the JSON of the search area, add a Get Geometry From JSON activity to the Search Override Workflow, and use the JSON as input to the Json parameter for the Get Geometry From JSON activity you just added. Assuming the mentioned Get Geometry From JSON activity's ID is geometry1, we will be using =$geometry1.geometry.Polygon as input to the Set Property activity. The next section will point out how to fill the activity properly.
You may include this Get Geometry from Geometry Picker Workflow in the main Search Override Workflow, instead of copying the values over, to allow a higher degree of customizability during run-time; however, that will require using the geometry picker to set create the bounds polygon every time a search is commenced.
You may either do so by using it as a separate sub-Workflow, or copy all the activities to the start of the Search Override Workflow. You will need to adjust the input of the Get Geometry From JSON activity accordingly.
3 - Finishing the Workflow
After finding the search area's geometry, the process is the same no matter which method of obtaining the search area you chose. After you've performed the required setup as described in section 2.1 or section 2.2, head to the Search Override Workflow. There, we will populate the Set Property activity we've added in section 1. This activity is where we will replace the search area with the one we customized. Set up the activity as follows:
Object: Use=$getWorkflowInputs1.inputs.contextProperty Name: Use="SearchArea"Property Value:=$layer1.layer.Unwrap().FullExtentif you've followed section 2.1.=$geometry1.geometry.Polygonif you've followed section 2.2.
You may optionally add a graphical representation of the search area on the map. This might be helpful to visualize the search area and verify the work you've done. You can do so by adding a Get Symbol From JSON activity and populate its Json input as follows:
={
  "type": "esriSFS",
  "style": "esriSFSSolid",
  "color": [34,237,24,150],
    "outline": {
    "type": "esriSLS",
    "style": "esriSLSSolid",
    "color": [110,110,110,150],
    "width": 1
  }
}
You may change the opacity value, the last number in the color parameter, to a lower value for better visualization.
Then, add a Create Feature activity and fill out the inputs as follows:
Geometry: Use the same value you used to fillProperty Valueinput in theSet Propertyactivity.Symbol: Use the symbol created in theGet Symbol From JSONactivity.
4 - Updating the Mobile app JSON and overriding the Search functionality
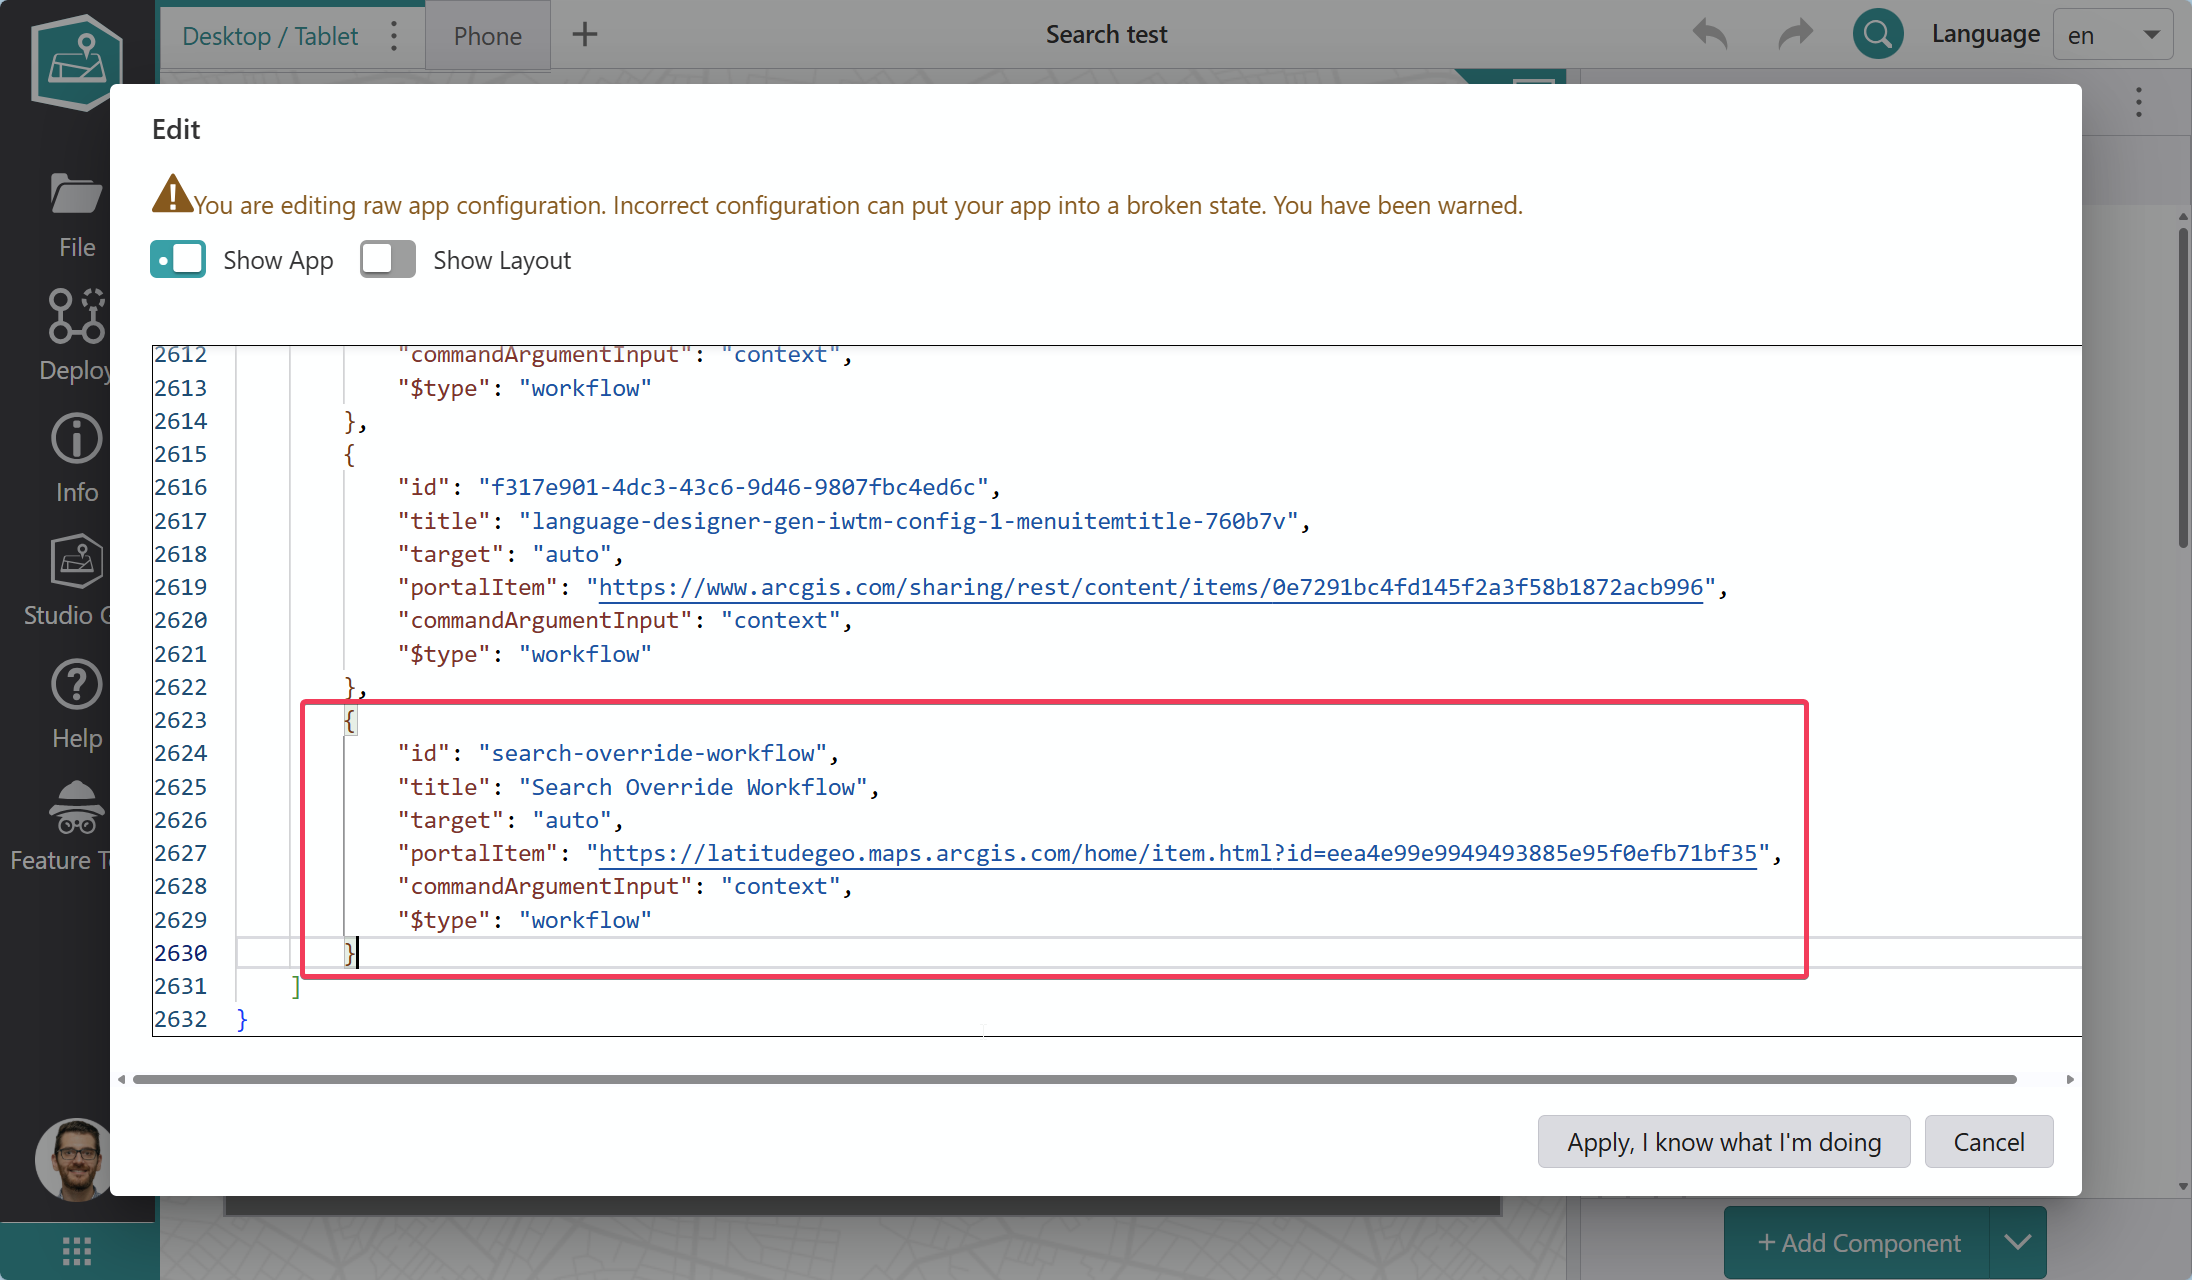
To use this Workflow we've created in Mobile, launch the SuDo editor in Designer using Ctrl+Shift+E and scroll to the bottom. There, add a new entry to reference the Search Override Workflow we created earlier. You may use the following template and replace portalItem with your Workflow's ArcGIS portal link:
{
    "id": "search-override-workflow",
    "title": "Search Override Workflow",
    "target": "auto",
    "portalItem": "<Replace me>",
    "commandArgumentInput": "context",
    "$type": "workflow"
}
When done correctly, the app JSON should look like the following:
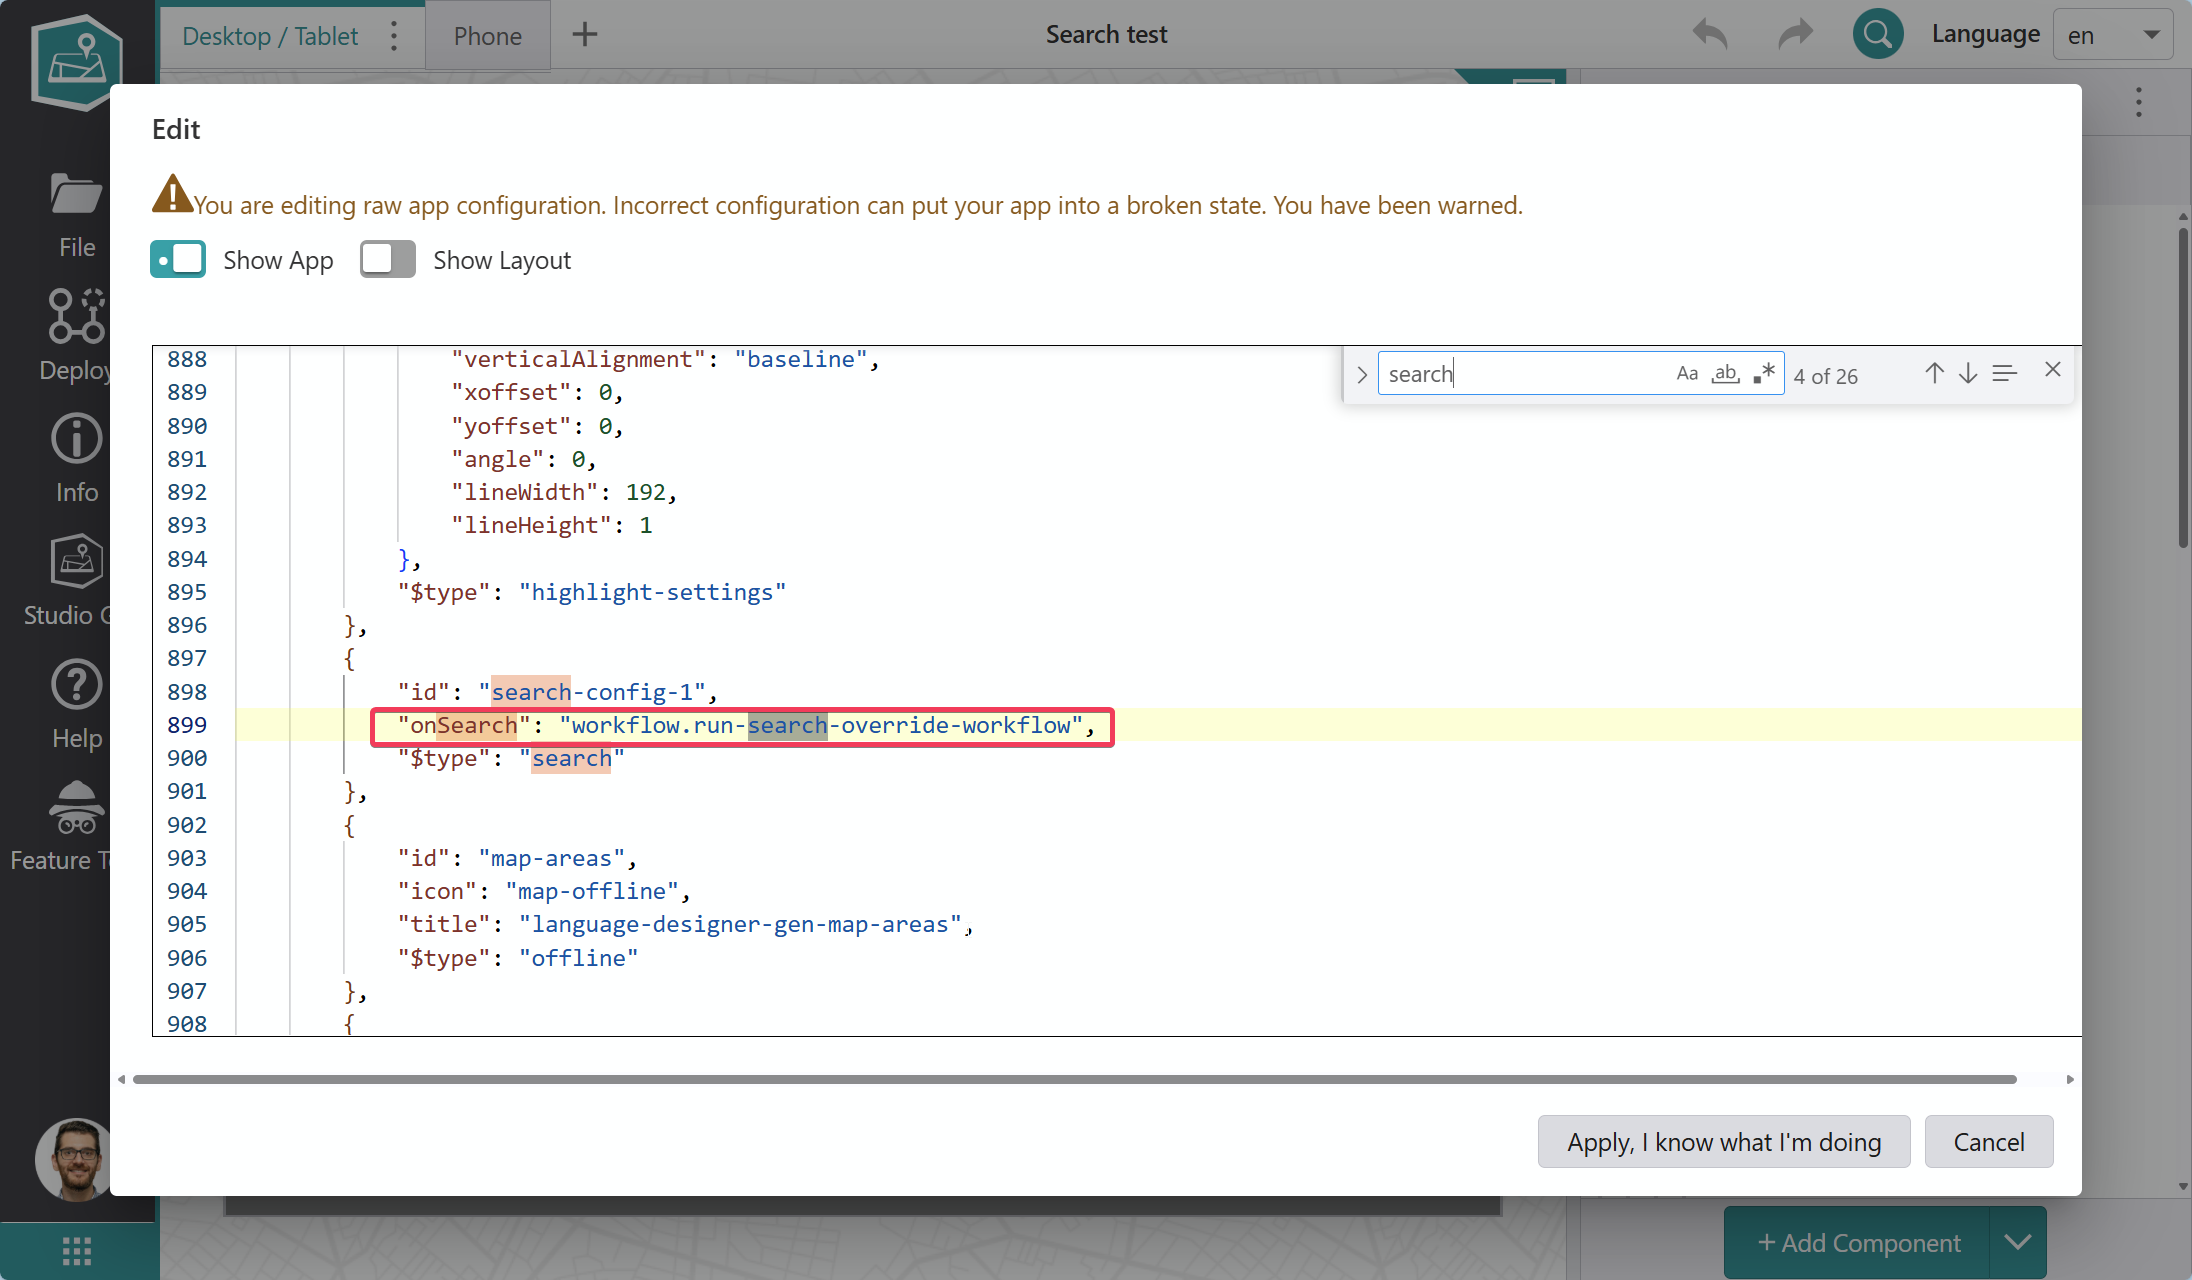
Lastly, look up the search object in Designer, which you can find by searching (Ctrl+F) for "$type": "search". Change it from
{
    "id": "search-config-1",
    "$type": "search"
},
To
{
    "id": "search-config-1",
    "onSearch": "workflow.run-XXXX-XXX-XX-XXXXX-XXXXXX",
    "$type": "search"
},
Where you replace the XXX... with the value of the id field you typed in the previous step. So it looks like the following:
After that is done, click on the Apply, I know what I'm doing button and wait for Designer to load, then save the app. Launch the app in Go and attempt to search for a feature that doesn't exist in the visible extent. If you've done everything correctly, the search should go through with the configured extent.