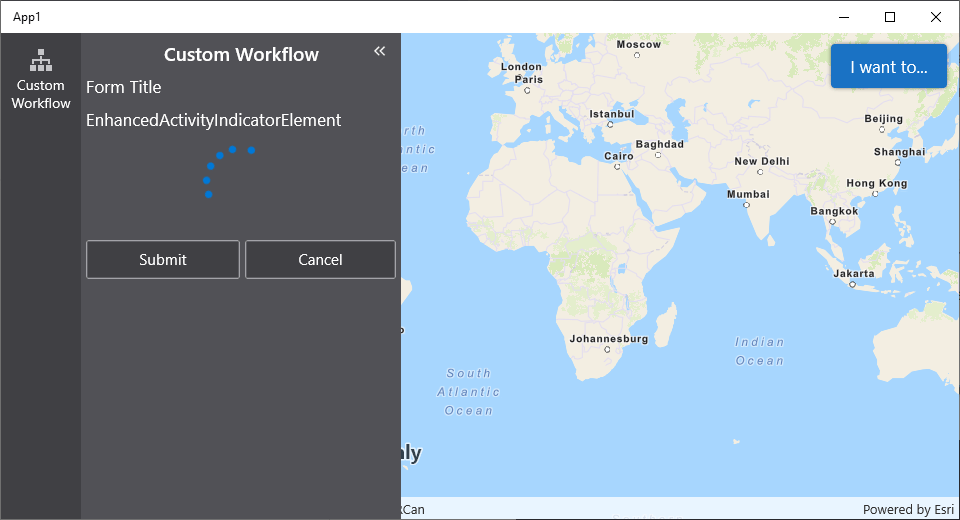
Implement an Loading Indicator Form Element
Implementing a custom form element allows you to augment the existing form elements that come with VertiGIS Studio Workflow. This article will walk you through creating a form element that displays a loading indicator.
Prerequisites
Extending VertiGIS Studio Workflow for Mobile requires development and deployment of a custom VertiGIS Studio Mobile Application using the VertiGIS Studio Mobile SDK
Follow the instructions in the VertiGIS Studio Mobile SDK page to set up the environment for extending Workflow for VertiGIS Studio Mobile.
A working knowledge of C# and .NET Standard is recommended before extending Workflow for VertiGIS Studio Mobile
Overview
Implementing a custom form element in VertiGIS Studio Mobile consists of three steps:
- Creating the custom form element and implementing the UI.
- Creating an activity which will register this form component with VertiGIS Studio Workflow.
- Registering the activity with VertiGIS Studio Workflow and running it before using the custom form element.
Set up the Custom Form Element Skeleton
- Using Visual Studio, create a new file, using the Xamarin Forms: Content View template. Name the file
LoadingIndicator.xaml, and place it in the platform agnostic project of the VertiGIS Studio Mobile Quickstart. - Change the base class to
ContentComponentboth in the xaml and in the code-behind.
<?xml version="1.0" encoding="UTF-8"?>
<core:ContentComponent xmlns="http://xamarin.com/schemas/2014/forms"
                       xmlns:x="http://schemas.microsoft.com/winfx/2009/xaml"
                       xmlns:core="clr-namespace:VertiGIS.Mobile.Workflow.Core;assembly=VertiGIS.Mobile.Workflow"
                       x:Class="App1.Workflow.LoadingIndicator">
    <ContentView.Content>
        <Label Text="Hello Xamarin.Forms!" />
    </ContentView.Content>
</core:ContentComponent>
using VertiGIS.Mobile.Workflow.Core;
using Xamarin.Forms.Xaml;

namespace App1.Workflow
{
    [XamlCompilation(XamlCompilationOptions.Compile)]
    public partial class LoadingIndicator : ContentComponent
    {
        public LoadingIndicator(VertiGIS.Workflow.Runtime.Definition.Forms.Element element, string name)
            : base(element, name)
        {
            InitializeComponent();
        }
    }
}
Set up a Form Element Registration Activity
- Create a new file
FormElementRegistrationActivity.csin the platform agnostic project of the VertiGIS Studio Mobile Quickstart. - Add a new form registration activity that implements
RegisterCustomFormElementBase. - Register the
LoadingIndicatorform element in theExecutemethod of the activity.
Only one form element registration activity is needed per app, as it can register multiple custom form elements. Learn more about implementing custom activities.
using VertiGIS.Workflow.Runtime;
using VertiGIS.Workflow.Runtime.Activities.App;
using System.Collections.Generic;
using System.Threading.Tasks;

[assembly: Export(typeof(FormElementRegistrationActivity))]
namespace App1.Workflow
{
    class FormElementRegistrationActivity : RegisterCustomFormElementBase
    {
        public static string Action { get; } = "uuid:<uuid>::FormElementRegistrationActivity";

        public override Task<IDictionary<string, object>> Execute(IDictionary<string, object> inputs, IActivityContext context)
        {
            IDictionary<string, object> result = new Dictionary<string, object>();
            Register("LoadingIndicator", typeof(LoadingIndicator), context);
            return Task.FromResult(result);
        }
    }
}
Register the Form Element Registration Activity
Register the RegisterCustomFormElementBase class in the IActivityHandlerFactory for the application.
Learn more about activity registration in the activity reference.
using System;
using System.Collections.Generic;
using System.Threading;
using System.Threading.Tasks;
using App1.Workflow;
using VertiGIS.Mobile.Composition;
using VertiGIS.Workflow.Runtime;
using VertiGIS.Workflow.Runtime.Definition;
using VertiGIS.Workflow.Runtime.Execution;

[assembly: Export(typeof(ActivityLoader), SingleInstance = true, AsImplementedInterfaces = true)]
namespace App1.Workflow
{
    public class ActivityLoader : IActivityHandlerFactory
    {
        /// <summary>
        /// Gets a mapping of action names to implementations of <see cref="IActivityHandler"/>s.
        /// </summary>
        private Dictionary<string, Func<IActivityHandler>> RegisteredActivities { get; } = new Dictionary<string, Func<IActivityHandler>>();

        public ActivityLoader(Func<FormElementRegistrationActivity> formElementRegistrationActivityFactory)
        {
            RegisteredActivities[FormElementRegistrationActivity.Action] = formElementRegistrationActivityFactory;
        }

        /// <summary>
        /// Creates an <see cref="IActivityHandler"/>.
        /// </summary>
        /// <param name="action">The name of the action to create.</param>
        /// <param name="token">The cancellation token.</param>
        /// <param name="inspector">The <see cref="ProgramInspector"/> for the program.</param>
        /// <returns>The activity handler for the given action.</returns>
        public Task<IActivityHandler> Create(string action, CancellationToken token, ProgramInspector inspector = null)
        {
            if (action == null || token.IsCancellationRequested)
            {
                return Task.FromResult<IActivityHandler>(null);
            }

            if (RegisteredActivities.TryGetValue(action, out Func<IActivityHandler> handlerType))
            {
                return Task.FromResult(handlerType());
            }
            else
            {
                return Task.FromResult<IActivityHandler>(null);
            }
        }
    }
}
Add the Loading Indicator
Next we can add the loading indicator to the form element xaml.
<?xml version="1.0" encoding="UTF-8"?>
<core:ContentComponent xmlns="http://xamarin.com/schemas/2014/forms"
                       xmlns:x="http://schemas.microsoft.com/winfx/2009/xaml"
                       xmlns:core="clr-namespace:VertiGIS.Mobile.Workflow.Core;assembly=VertiGIS.Mobile.Workflow"
                       xmlns:views="clr-namespace:VertiGIS.Mobile.Toolkit.Views;assembly=VertiGIS.Mobile.Toolkit"
                       x:Class="App1.Workflow.LoadingIndicator">
    <ContentView.Content>
        <views:EnhancedActivityIndicator IsEnabled="{Binding IsEnabled}" IsRunning="True" HeightRequest="75" WidthRequest="75" Margin="10"/>
    </ContentView.Content>
</core:ContentComponent>
Test your Activity
Now you can build a workflow for VertiGIS Studio Mobile that uses your new custom form element! It is essential that this custom activity be run before the custom form element is used. It is best practice to run the form element registration activity at the start of a workflow.
You can
download this demo workflow
that registers and displays the custom form element and
import it into the VertiGIS Studio Workflow Designer.
Next you need to run the workflow you just created in your VertiGIS Studio Mobile SDK project.
You can do this by configuring the layout and app config to run a workflow. You will need to copy the ID of the the workflow you created into the app.json
https://apps.vertigisstudio.com/workflow/designer/#workflow= 44010fc421dd4659b74fb921e09ba594
- App Config
- Layout
- UI
{
    "schemaVersion": "1.0",
    "items": [
        {
            "$type": "layout",
            "id": "desktop-layout",
            "url": "resource://layout-large.xml",
            "tags": ["large"]
        },
        {
            "$type": "workflow",
            "id": "custom-workflow",
            "title": "Custom Workflow",
            "target": "#taskbar",
            "portalItem": "<your-workflow-id>"
        },
        {
            "$type": "menu",
            "id": "iwtm",
            "items": [
                {
                    "title": "Run Custom Workflow",
                    "isEnabled": true,
                    "iconId": "workflow",
                    "action": {
                        "name": "workflow.run",
                        "arguments": {
                            "id": "custom-workflow"
                        }
                    }
                }
            ]
        }
    ]
}
<?xml version="1.0" encoding="utf-8" ?>
<layout
    xmlns="https://geocortex.com/layout/v1"
    xmlns:gxm="https://geocortex.com/layout/mobile/v1"
    xmlns:xsi="http://www.w3.org/2001/XMLSchema-instance"
    xsi:schemaLocation="https://geocortex.com/layout/v1 ../../ViewerSpec/layout/layout-mobile.xsd">
	<gxm:taskbar id="taskbar" orientation="vertical">
		<map slot="main">
			<stack margin="0.8" slot="top-right" halign="end">
				<iwtm config="iwtm"/>
			</stack>
		</map>
	</gxm:taskbar>
</layout>
Relevant SDK Sample
Check out the relevant VertiGIS Studio Mobile SDK Sample: