Implement an Activity that Calculates a Logarithm
Implementing a custom activity allows you to build a reusable, completely custom behavior to augment the existing activities that come with VertiGIS Studio Workflow.
In this article, you will learn how to create a custom activity that calculates the logarithm of a number with a given base.
Prerequisites
Follow the instructions in the Web Applications SDK page to set up your development environment.
A working knowledge of TypeScript is recommended before extending Workflow for web-based hosts.
Set up Activity Skeleton
To create a new activity:
- Open the Workflow activity SDK in Visual Studio Code
- Run
npm run generatein the terminal. - When prompted enter the name of the activity you would like to create and press
Enter. For example,CustomActivity. - Open the newly created
src/activities/CustomActivity.tsfile.
Implement the Activity
The npm run generate script creates a custom activity with some dummy inputs and outputs. By changing the inputs, outputs, execute logic, and tags, you can create your own custom activity that has an easy to use interface in the VertiGIS Studio Workflow Designer.
First, let's change the inputs and outputs to properties that make sense for calculating a logarithm.
Block tags are used to provide descriptions for inputs and outputs in the VertiGIS Studio Workflow Designer.
import type { IActivityHandler } from "@vertigis/workflow/IActivityHandler";

export interface CalculateLogInputs {
    /**
     * @description The base of the logarithm. Defaults to the natural log.
     */
    base?: number;

    /**
     * @description The number to calculate the logarithm for.
     * @required
     */
    value: number;
}

export interface CalculateLogOutputs {
    /**
     * @description The logarithm output.
     */
    result: number;
}

/**
 * @category Custom Activities
 * @description Calculates the logarithm of a number with an optional base.
 */
export class CalculateLog implements IActivityHandler {
    async execute(
        inputs: CalculateLogInputs
    ): Promise<CalculateLogOutputs> {
        return { result: 0 };
    }
}
Next, modify the execute method of the activity to calculate the logarithm of a number given an optional base
import type { IActivityHandler } from "@vertigis/workflow/IActivityHandler";

export interface CalculateLogInputs {
    /**
     * @description The base of the logarithm. Defaults to the natural log.
     */
    base?: number;

    /**
     * @description The number to calculate the logarithm for.
     * @required
     */
    value: number;
}

export interface CalculateLogOutputs {
    /**
     * @description The logarithm output.
     */
    result: number;
}

/**
 * @category Custom Activities
 * @description An activity that calculates the log of a number with the given base.
 */
export class CalculateLog implements IActivityHandler {
    async execute(
        inputs: CalculateLogInputs
    ): Promise<CalculateLogOutputs> {
        return {
            result:
                Math.log(inputs.value) /
                (inputs.base !== undefined
                    ? Math.log(inputs.base)
                    : 1),
        };
    }
}
Deploy the Activity
Follow the instructions to build and deploy the activity pack.
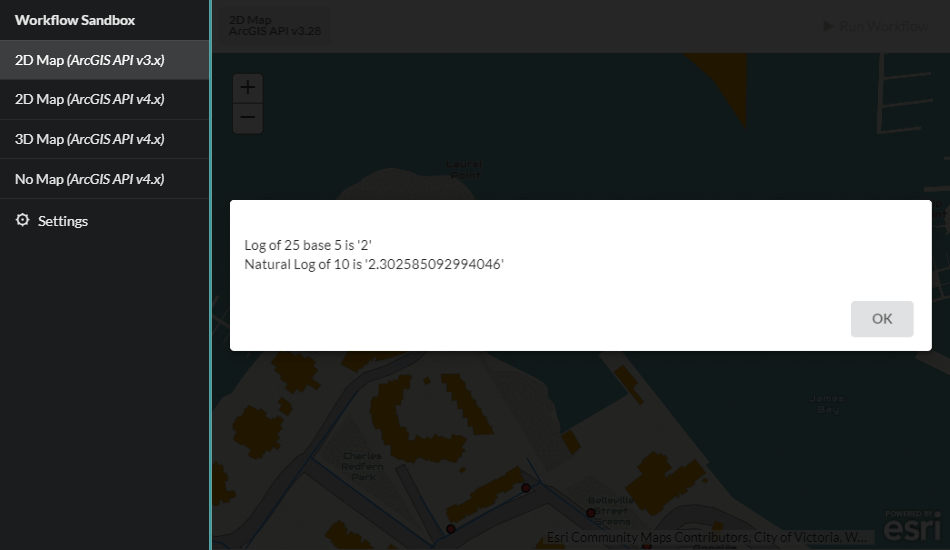
Test the Activity
Once your activity pack is hosted and registered, your custom activity should appear in the activity toolbox in VertiGIS Studio Workflow Designer alongside the built-in activities, and can be used in the graphical interface like any other activity.
Now you can build a workflow that uses your new custom activity!
You can download this demo workflow that uses the custom activity and then import it into the VertiGIS Studio Workflow Designer You will have to deploy the custom activity and form element for it to function. This workflow assumes you are hosting the activity pack with the dev server on https://localhost:57999/.
Next Steps
Now you know how to build a basic Workflow activity for web applications. Next, you can learn how to access app properties in an activity, build custom form elements, use the ArcGIS API for JavaScript in your activities and more.
Implement a Custom Form Element
Implement a custom form element for applications like VertiGIS Studio Web
Add a Layer to the Map with a Custom Activity
Access application properties like the map in custom activities for Web Applications
Use the ArcGIS API for JavaScript in an activity.
Use the ArcGIS API for JavaScript in an activity or form element
Reference other Third Party Libraries
Reference other third party libraries in your activities and form elements